
Centralizing NAT Gateway Using AWS Transit Gateway Across Multiple Accounts
As your AWS infrastructure grows across multiple accounts, cost management and resource centralization become crucial. One significant area where AWS users can optimize resources is network connectivity, especially when dealing with NAT Gateways. Traditionally, each AWS account or VPC has its own NAT Gateway, which can result in higher costs and complexity in management. By utilizing AWS Transit Gateway (TGW) and centralizing your NAT Gateway, you can simplify network architecture, reduce operational overhead, and optimize costs across multiple AWS accounts.
In this blog, we will walk through the steps to centralize a NAT Gateway using AWS Transit Gateway, along with the benefits of this architecture.
Why Centralize NAT Gateways?
Before diving into the architecture, let’s quickly outline the benefits of centralizing NAT Gateways:
- Cost Reduction: Each NAT Gateway has associated hourly charges and data processing costs. By centralizing, you reduce the number of deployed NAT Gateways.
- Simplified Management: You only need to manage a single NAT Gateway in a dedicated VPC, reducing the operational complexity across multiple accounts.
- Improved Visibility: By centralizing NAT traffic through a single gateway, you gain a unified view of all outbound traffic across your environment.
- Optimized Data Transfer: With AWS Transit Gateway, inter-VPC traffic can be handled more efficiently, reducing latency and improving performance.
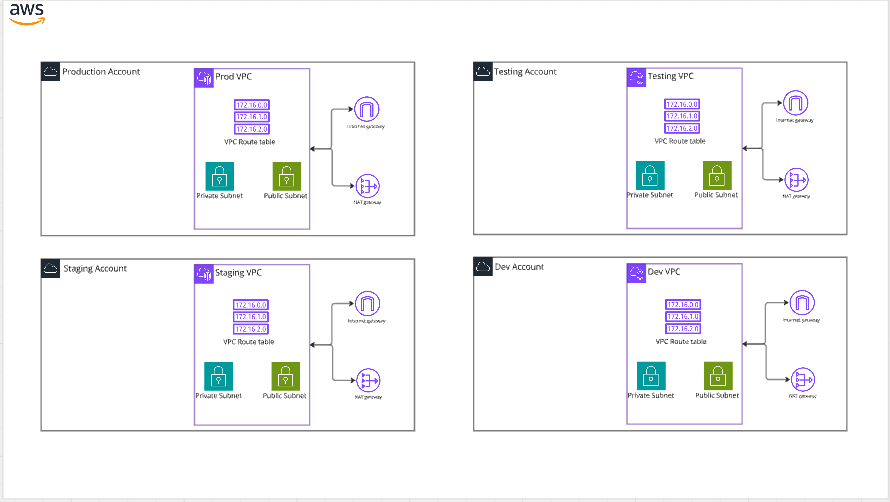
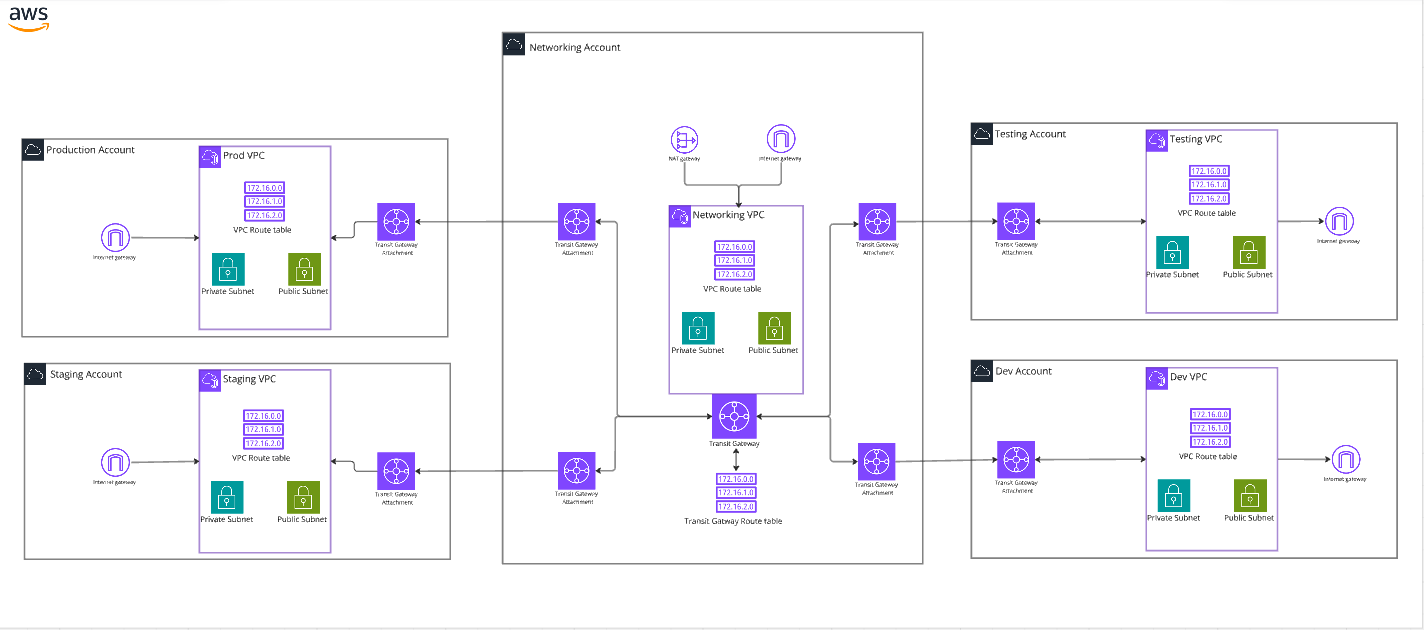
Architecture Overview
In a multi-account setup, we aim to centralize the NAT Gateway in a shared services VPC, which all other VPCs (spread across different AWS accounts) will route through for their outbound internet access. This is done using AWS Transit Gateway to connect the VPCs together.
Here’s an outline of the architecture:
- Shared Services VPC: Contains the centralized NAT Gateway and is connected to the internet.
- Spoke VPCs: These are the VPCs in different accounts that will use the NAT Gateway in the shared services VPC for outbound traffic.
- AWS Transit Gateway: Connects all the VPCs together and allows the spoke VPCs to route their traffic through the centralized NAT Gateway.
- Route Tables: Configured to ensure traffic is routed correctly via the Transit Gateway and towards the NAT Gateway.
Step-by-Step Guide to Centralizing a NAT Gateway
1. Create a Shared Services VPC with a NAT Gateway
The first step is to create the VPC that will host the NAT Gateway. This VPC will be in a shared services account or network account.
- Create a VPC in your network account.
- Ensure that the VPC has both public and private subnets.
- In the public subnet, create a NAT Gateway.
- Attach an Internet Gateway (IGW) to the VPC so that the NAT Gateway can access the internet.
2. Set Up AWS Transit Gateway
Now, we will create a Transit Gateway in the same account as the shared services VPC.
Go to the VPC Console and create a new Transit Gateway. Configure the Transit Gateway route tables. You will need to create two route tables: one for spoke VPCs and one for the shared services VPC.
Attach the shared services VPC to the Transit Gateway.
For each spoke VPC in your other accounts, create VPC attachments to the Transit Gateway.
3. Configure Route Tables for Traffic Flow
In both the shared services VPC and each spoke VPC, configure the route tables to ensure traffic flows correctly through the Transit Gateway and NAT Gateway:
Spoke VPC Route Table: Update the route table to send outbound traffic (0.0.0.0/0) through the Transit Gateway.
Shared Services VPC Route Table: Ensure that traffic from the Transit Gateway is routed through the NAT Gateway for outbound internet access.
4. Configure Security Groups
Ensure that security groups are properly configured to allow traffic between the spoke VPCs and the shared services VPC. Specifically:
Allow outbound traffic from spoke VPCs to the NAT Gateway. Ensure that responses from the internet can return via the Transit Gateway.
5. Test the Setup
Finally, test the setup by launching an instance in one of the spoke VPCs and verifying outbound internet connectivity. Ensure that traffic flows through the Transit Gateway and then to the NAT Gateway in the shared services VPC.
You can use the following command on your EC2 instance to check connectivity:
|
|
This should return the Elastic IP (EIP) associated with your centralized NAT Gateway.
Cost Considerations
While centralizing the NAT Gateway can significantly reduce costs, there are some factors to consider:
- Transit Gateway Data Processing Costs: AWS charges for data transferred across the Transit Gateway. However, this is often offset by the savings from reducing the number of NAT Gateways.
- NAT Gateway Data Processing Costs: Data processed by the NAT Gateway incurs charges, but since you only have one centralized gateway, this cost is easier to manage.
Conclusion
By leveraging AWS Transit Gateway and centralizing your NAT Gateway, you can simplify your network architecture, optimize costs, and improve manageability across multiple AWS accounts. This approach is particularly valuable in organizations with a growing number of AWS accounts and VPCs that require consistent outbound internet access. By centralizing NAT, you ensure that network traffic is handled efficiently and securely.
With this setup in place, your infrastructure will be more scalable, cost-efficient, and easier to maintain, making it a great solution for modern multi-account AWS environments.